Batty for Halloween

Bat quilt

Being an American, living in the UK, there are a variety of things that I miss (and don’t miss). I miss boxed cheesy macaroni. The kind with the silver package of artificial cheese spread that you squeeze out of the packet onto steaming hot macaroni shells. I swear they put some addictive chemical in that cheese because, while I’m all for homemade, there ain’t no homemade mac&cheese I’ve tasted that compared to what’s in that box.

Sad.

Another thing I miss? Halloween. Celebrated properly. With lots of little kids dressed up in the neighborhood, ringing doorbells, shouting trick or treat. Candy corn. Caramel apples. My grandma used to give out caramel apples as treats. Mind you, she lived in the country side and you had to be driven there to get them, so she didn’t have to make many. Scarecrows on porches. Pumpkins as decorations. Jack-o-lanterns at every house. Over the past decade or so that I’ve lived in the UK, Halloween has started to be more celebrated here but it hasn’t reached anything remotely approaching US standards. I try my best to encourage the neighbors to get into it by putting up Halloween decorations. I even screeched to a halt in my car the other day when I was going by a specialty greengrocer that happened to have small gourds for sale. Some of them are now sitting on my windowsill for decoration. The acorn squash, quite difficult to find here, is now in my belly.

A decoration I recently completed was my Batty for Halloween quilt, which I briefly mentioned before. I bought some Halloween fabric a couple of years ago when I was in the US during that season and finally found the perfect pattern to make with them. I mean, really perfect pattern!

I used a seam ripper a bit on this one as I did have trouble getting the bat wings from the 3 columns lined up. But the quilt top went together in an afternoon so it wasn’t that bad!

DSC04154

Because I didn’t have a specific project in mind when I bought the fabric, I only had a fat quarter of the fabric I ended up liking for the backing, and it wasn’t quite wide enough for the quilt top. So I cut some squares from my Halloween fabric scraps and added them to the backing fabric.

Halloween fabric

I machine quilted using stitch in the ditch but, because I followed the bat outlines, you see bats on the back too. Which I’m really loving. Look closely and I hope you can see them too.

quilted bat outline

Then, because I miss candy corn so much, not only did I have candy corn bats, but I bound the quilt with that fabric too.

binding fixed

I’m working on more homemade Halloween decorations. Soon I’ll have too many and I’ll be completely over the top. It’s just part of my nostalgia! Do you celebrate Halloween?

Appetite Disturbance

Appetite Disturbance

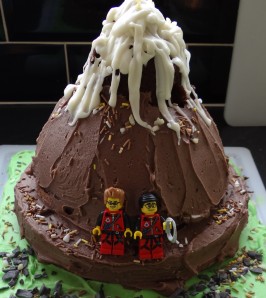
I like baking. I like baking cakes, especially. I especially like blogs that show cake baking at its finest. Like this blog and this particular cake. That is a lot of cake. And icing. And macarons. But really when would making such a cake be warranted? Can I really justify making this cake, and during the week, no less?

Sure can – because it’s World Mental Health Day today! And today at work there is a “bake-off” fundraiser. Each year, on October 10, the Mental Health Foundation holds a global celebration to promote mental health education, awareness and advocacy. The theme for 2014 is Living with Schizophrenia. The Mental Health Foundation website provides information about schizophrenia, and suggests holding a Tea and Talk fundraiser. Because this is for charity, I really wanted to bake something spectacular. I think that THAT cake fits the bill. For the bake-off, we need to name our cake. I’ve named mine “Appetite Disturbance” which is a symptom of schizophrenia. But it may also be what happens to people when they eat this cake.

Obviously this isn’t my recipe. I’m just following instructions – which are rather lengthy but very well-written. It is, however, an epic cake and I’d like to share my experience making it.

I typically make a cake, all of it, even an elaborate one, the day before I’m going to serve it.

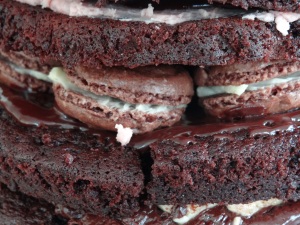
This cake required different three different kinds of icing: Swiss meringue buttercream frosting, ganache, and a glaze. Even the buttercream was split into three different flavours: vanilla, strawberry and chocolate. 2 (yes, 2) flavours of macarons. 3 cakes cut in half horizontally to make a 6 layer cake. Didn’t I say that was a lot of cake?

Even if I stayed up all night, I wasn’t sure that I would finish it. So I started on Tuesday, making the buttercream and one batch of the macarons. The next night I made the other batch of macarons, ganache, and the cakes. Yesterday I make the glaze, and then put everything together. Putting it all together was relatively easy. But here’s some problems that I had, which I normally wouldn’t have had if I would have made it all in one go.

First, the buttercream. I would normally make this and then frost/ice the cake immediately. But the instructions said the buttercream could be left in the fridge for 5 days before use. I’m good at following instructions. But when I got it out of the fridge, it was obviously very hard to spread and I wasn’t sure whether to leave it out to get warm – which would have taken forever – or what. So I stirred it to get it warmed up. And it curdled and stayed curdled. No picture here. It’s ugly. I was about to throw it out and start again, but then remembered that handy invention called the web. I internet searched for how to “un-curdle” swiss meringue buttercream. Hint: heat up about ½ cup of the curdled stuff in a microwave, until it’s runny, and then while the mixer is going, pour the heated stuff back into the mixer with the curdled stuff and the icing will become smooth again. True story.

Second, the macarons. Wanna know how many videos I watched on how to make macarons before I made them? No, trust me, you don’t. I’ve actually made them twice before. The first time, they were near perfect. The second time, they were close to inedible. The thing about macaron dough is that if you under-mix, then you get cracks in the top which is not how it should look like, and if you over-mix, then you don’t get the classic “feet” – you just get a very flat meringue/sugar disc. This time, when I made the strawberry flavour, I thought I was nearly to the point of over-mix and was worried about lack of feet. But they turned out great! You can see them on the top of the cake.

For the chocolate flavour, I really didn’t want to push it as close as I thought I had with the strawberry so I didn’t mix it as much. And while I got feet, the macarons aren’t smooth and shiny on the top, and a couple are cracked. So I think that was slightly under-mixed.

Chocolate macarons

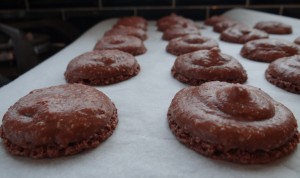
For that reason, none of the chocolate macarons are displayed on the cake top, only inside the cake.

macaron inside cake

Third, the ganache. Ganache can split/break/separate. Essentially instead of a nice shiny glossy smooth chocolate spread, you get a grainy oily mess that has no business being put on a cake. When I made the ganache the night before I needed it, it was fabulous. Exactly what you expect. Then I put it in the fridge to microwave the next day. The instructions said I could! I was very very careful about not putting the ganache in the microwave for too long between stirs, but I could see it was close to separating. It finally came together but I did have to give it a zap during the cake construction process because it kept going a bit grainy.

In the end, the cake came together fine.

Second layer

The second of six layers. Ganache and macarons.

6 layer cake

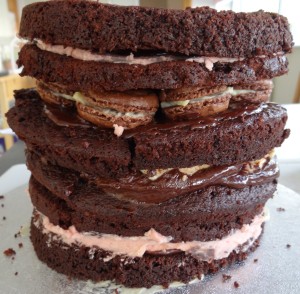
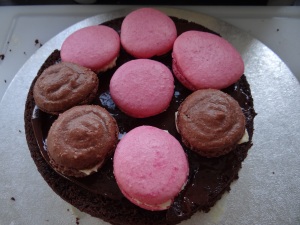
6 layer naked cake. Don’t worry – it will look better in a minute.

Not naked cake

I just had a few panics during its construction because of my inexperience in storing individual bits and then putting the cake together. Overall, I think it looks pretty good. I’m hoping that I won’t be able to show you what it looks like inside, in a future post, because it means the cake will be all gone. More money for the charity and less temptation for me.

My next challenge? How in the world am I going to get this cake to the office for the bake-off?

cake light 2


Blog hop? Who me?

Follow my blog with Bloglovin

I haven’t been blogging long but have already found such a welcoming spirit in this electronic world. I was nominated by the very talented Hayley Margaret from A Stitch to Scratch (don’t you just love, love, love that blog name!) to participate in a crafty blog hop. I’m not sure where it originated but I’m so surprised but also chuffed to be included! I answer 4 questions below and then get to nominate two other bloggers to participate.

Why do I write?

Most of what I write is really formal, related to work. Lots of technical words, no flowery adjectives allowed, precision writing that takes care and a lot of time. All important and necessary, but lacking personality. When I decided to start a blog, so that I could keep ‘fieldnotes’ on my fabric and flour projects, it also gave me the opportunity to write in my informal voice, the way I would talk to a friend. For me, blog writing is a really quick way to express my creativity, whereas my professional writing is a slower way to describe a different aspect of my creativity.

What am I working on?

I’ve got so many projects, both fabric and flour, that I’m either in the middle of or want to start. To keep track of my fabric projects, I made my own clip boards, out of card board and a bull dog clip, backed the clip board with crafting paper that had quilt-y themes, and then printed my lists using free downloadable backgrounds and fonts (thanks, Pinterest!). I have four which hang next to my cutting table.

mini quilt clipboard

I’m after some washi tape to dress up the bull dog clips and make them look less…boring.

But what I really need to finish is this Halloween quilt.

bat quilt top

Bat quilt top

backing of bat quilt

Quilt back

I “only” have to make it into a quilt. I like piecing quilt tops together, but haven’t embraced quilting yet. To finish in time for this Halloween, I’ll probably just stitch in the ditch, and grumble the whole time. I hope to post about this project soon.

For flour projects, my workplace is sponsoring a charity bake-off on Thursday, which I’ve entered. My planned bake has 6 layers and includes macarons. I’ll be posting about whether this went to plan (or not!) later this week.

How does my blog differ from others of its genre?

Hmmm….Uh….[long pause]. I was inspired by a lot of baking and quilting blogs. And something I noticed in the ones I found particularly inspiring was that I got a real sense of the passion and personality of that person. So in some ways, I hope my blog isn’t that different from others of its genre, because I want to share my passion for crafting and baking, in my own voice. If that happens to inspire someone to do a particular project or make a particular bake, then I’d be chuffed about that too. Oh, and the pictures on my blog are different (read: worse) than other blogs – definitely a skill I need to improve!

How does my writing process work?

I literally just sit down and write as if I was talking to a close friend. Although in normal speech I probably swear…And I keep a list of ideas for posts and work on them when the moment strikes. Blogging has also meant that I need to keep crafting and baking so that I can keep posting. It’s my own way to keep myself inspired and motivated.

The blogs I’d like to nominate next week are:

First, don’t forget to follow A Stitch to Scratch! Then, when you’ve done that, you should check out these relatively new bloggers. This took me awhile because there are so many inspiring blogs out there. But…I finally chose based not only on content but, because I want to improve my photography, I’ve chosen blogs whose photos I very much admire. They also happen to be hosted by couples.

I’d like to nominate Perelincolors, a blog about travel to gorgeous places. I love their “About” page too because their posts are inspiring – just what they set out to do. They are also relatively new bloggers and so I’d like to give a shout out to them.

My second nomination is for Amaryllislog. A mix of fabulous photography and entertaining commentary on life, crafts, cooking, nature, and did I mention the photos? This is a more established blog and I’m sure I can learn a lot from them.

Bad blogger, bad!

Follow my blog with Bloglovin

I’m new to blogging (learn more about me here and why I blog here) and registered for WordPress’s Blogging101. Each week day we get an assignment to help us understand “good blogging” and improve techniques. There will be 30 days of assignments.

One recent assignment was to take the Daily Prompt, another writing tool provided by WordPress, and write a post around the prompt. The prompt for October 2 was “Ready, Set, Done”.

At Day 13, nearly half way done, I’ve found Blogging101 to be brilliant. I was ready to start blogging but didn’t have a clue how to go about it. I’ve posted a few times now, learning and remembering each time. For example, I kept forgetting to tag and categorize my posts but I think I’ve set up my system for posting so that I won’t forget. However, I have an admission to make, as I’m feeling kinda guilty – I’ve only done about half of the assignments. Part of this is due to technophobia. Part of it is time. Part of it is that I can’t believe that I’m blogging to begin with (squeal) – something I never thought that I’d do but am now having loads of fun doing!

So for my Blogging101 community (and the blogging community in general), please let me dull my guilt by apologizing. I’m sorry that I haven’t been a good neighbor, that my widgets aren’t in order, and that my sidebar lacks links to blogs I love. Hopefully I’ll catch up soon, but in the meantime, let’s all just keep on having fun! Ready, set…blog.

Put a zip in it!

At the end of August, I saw this tutorial for a cute shark pencil case that I thought both boys would love. I showed the picture of the finished product to them and got animated nods to go ahead. I was hoping to have them made in time for the start of school.

Shark fabric

But that was delayed -I just couldn’t get my head around some of the instructions and was less than enthusiastic about putting in a zipper “in the round” no less. I have no formal sewing training and had never put a zip in anything (although I was frequently asked to “put a zip in it” but I’m pretty sure that wasn’t a reference to sewing!). It didn’t help that a lot of comments from crafters about the tutorial indicated that they were having difficulty seeing how the zipper was put in. I have no idea why I decided to go ahead. Partly I didn’t want to disappoint the boys, and partly because I love a challenge – it can’t be that hard, can it?

Ahem.

To make the outside of the sharks, I used Comma pre-cut charm squares, a Zen Chic for moda line. Not sure when this came out but I’ve had it in my stash for at least a year. It’s a great mix of charcoals and black. The inside was a scrap of red fabric that I’ve had in my stash since, well, I started a stash. Putting together the outside of the shark was relatively simple.

Shark body

But I got stuck on number 4. So a clarification of the methods: from instruction number 4 – 8, this refers to the FINS only. Finally figured that one out.

Zip attempt number 25!

Then came the zip (and inner lining). I pinned these two layers to the shark in lots of different ways and then tried to turn it the right side out so that I could see which way was correct. I stabbed myself with pins a lot doing this. When I finally I thought I had it figured out, I started up the sewing machine. A normal foot wasn’t going to work as the space was so small. I tried using my zipper foot – of which I have 0 experience and for which I couldn’t even get it to stay on. So I took the foot off and sewed without a foot. At all. That’s probably all sorts of major sewing rules completely thrown out the door. Afterwards, I thought I should have tried my darning foot, although I’m not sure that would have worked either.

I first sewed the zip to the shark and then sewed the red inner lining to the zip, rather than do both the zip and the lining to the shark at the same time. The primary issue with sewing without a foot is that it is really hard to keep the stitches straight. Once sewn, I used some hand stitches, especially at the mouth corners, to help stabilize the zip.

DSC04107

All things considered, I don’t think the zipper mouth, open, looks too bad. A bit wonky on one edge because of the wobbly seam.

The main issue is how the zip closes. It hardly looks professional and it bugs me…deeply.

Finished shark

One thing about using templates is ensuring that they are printed out at the right scale. I thought I had printed out the template at 100%, but the final shark did seem pretty small with lots of excess zip (in the end I cut the zipper shorter) and the pouch wasn’t quite deep enough for new pencils. Argh. So maybe I didn’t print it out to the correct scale.

All these problems I could see in the finish. But the lovely thing? When I handed them over to the boys, they saw none of these. They just simply loved that their mum had made them a “cool” shark pencil case, which they now keep in their school desk and contains well-loved (read: short) pencils. So while the imperfections may annoy me, the joy I received from their non-judgmental reaction helps me to move on from those mistakes. In the end, it appears, I learned more from this project than just how to swear at a zipper.

The Mountain Man returns

15 (long) days ago, the Mountain Man left for a walking trek up the Atlas Mountains in Morocco. As a welcome home treat, the boys wanted to make a cake. I had visions of a really nice mini-cupcake I’d see on a favourite blog. I was really looking forward to making it. So I showed the boys. It was met with a distinct lack of enthusiasm, followed by: “No, Mum. A mountain cake”.

“Umm? Hmm. Ok…are you sure?”

“Yes. A mountain cake.”

Knowing what I was comfortable making, working with, and had on hand, I put together a Plan. Yes, this one called for a capital letter.

I seriously thought about buying a couple of boxes of cake mix and some packaged frosting (icing). Both of these US baking stalwarts are only really starting to take off here. But in the end, I decided if I had to make a Mountain Cake, I wanted an authentic one. However, I wasn’t going to go all out. There is something about a novelty cake that makes me think that the contents won’t be the star. And I had helpers; while Boy 1 and Boy 2 are super enthusiastic, complicated cake recipes weren’t going to work. So I used a basic recipe for chocolate cake from the New Joy of Baking, along with the basic buttercream icing. And off we went.

Chocolate cake in the making

The obligatory bowl of soon-to-be-cake.

Yeah, I’m not convinced either. Although the eggs weren’t in yet…

We made 3 batches of cake mix and distributed it into a jelly roll pan (kinda like a texas sheet cake pan), a 8″ round cake tin, and a medium pyrex bowl. We then made the buttercream frosting and coloured one portion green, one portion brown, and then left the last bit white. I found some sprinkles that we use for ice cream that had been hanging around for a bit looking for a good purpose (other than ice cream, of course).

I had plenty of help with the icing and decorating. Here’s what we ended up with.

Mountain Cake

The jelly roll cake provided the base, the round cake was the bottom of the mountain, and the pyrex formed the dome part of the mountain. The craggy top was made from offcuts from the bottom of the dome (so that the dome could sit flat).

Mountain cake 2

The boys enjoyed finding appropriate lego figures for Mountain Man (right) and his bestie. They are pretty good likenesses! Although, it’s really just walking, not climbing…

DSC04116

Overall, I’m pretty happy with the way this turned out. Mountain Man is back tomorrow, and then we’ll know how it tastes. But frankly, the boys had so much fun doing it, it doesn’t matter.

Now brought to you by…the letter S

During the spring, before I really got crafting again, I was stalking following along with the Moda Designer Blog Hop: Spell it with Fabric. Each day a different quilter, or set of quilters, was featured for various letters. If you do a web search, then you’ll be able to track down all the letters as it was a free blog hop. And there are plenty of Pinterest boards showing all the designs.

All the letters were really cute but I didn’t want to make a full alphabet quilt. My boys are a bit too young for that. So I opted for one letter which is the start of both my husband’s and my last name. The letter S. But S on it’s own, while shapely, is rather boring. During the blog hop I saw one designer who had personalized their letter by adding a smaller block within the letter block and I thought that would add a bit of excitement.

The problem was that the designer didn’t add any details about how she added the smaller block. It looked like it was a Sawtooth Star block and I liked the look. The contrast with the curvaceousness of the S with the 8 points of the star appealed. The problem was designing it to fit the S block. I knew approximately what height I wanted the star block to be but the Sawtooth involves half square triangles and, it had been such a long time since I’d sewn, that it took me awhile to figure out how to the size each piece. And I wish I would have saved my calculations…[yet another reason for this blog!]

The letter S in fabric

In the end, I was quite happy with it although it was slightly too large as I wanted to line up the bottom of the star block with the bottom of the top arm of the S. To do that, the top of the mini-quilt ended up being a bit wonky.

Sawtooth Star

Part of the issue was that, when I was piecing this, I hadn’t invested in a 1/4 inch foot. I was having loads of trouble with getting seams to line up. Now I have one – see that beauty below? They are cheap, people, and worth every penny!

1/4 inch foot

I also did some beginning free motion quilting – the trauma of which I’ll post more about in the future.

FMQ

This mini-quilt is definitely not perfect, in a number of different ways, but I like it anyway. It represents my returning adventure in fabric, which I think is pretty Special.

Bound

Maple Syrup – UK gold dust

A Saturday morning, without any running around to do, calls for coffee and baking. I’ve been wanting to make some donuts and had my eye on a recipe from one of my favourite baking bloggers*. Maple Glazed Donuts sounded like just the perfect addition to my lovely cappuccino.

As the name suggests the donut glaze uses maple syrup. As an ex-pat in the UK, finding ingredients that are common in the US can sometimes be challenging here. Maple syrup is one of them. People really don’t know what to do with it, and pancakes – as I know them – aren’t on any breakfast menus. And when you can find maple syrup, it’s jaw-droppingly expensive. I’m trying to contain my excitement now that Costco has arrived here. I bet I was one of the first people to take out a membership at our local store! But I haven’t bought any syrup from there yet because whenever I go to the States to visit my family, I come back home with some that has been locally tapped. It’s a bit of a risk to pack the glass bottles (yup, that’s what the locals use) in my luggage and then let the baggage handlers have at it. When I get home, I always breathe a sigh of relief that no leakage has occurred.

My main decision this morning was whether I really wanted to part with a half cup of home tapped syrup from my very last bottle. But it was a Saturday morning, without anything that absolutely had to be done. There isn’t much more indulgent than that when you have two boys with loads of activities. So maple glazed donuts, here we come.

These baked donuts use a spiced cake base which was really easy to put together. I followed the recipe exactly, including the tip about filling the donut pan (put the dough in a plastic bag and cut off the tip to squeeze out).

Maple Glazed Donuts

After just 10 minutes, these beauties came out.

DSC04070

And when they were cooled, I just dunked them in the maple syrup glaze.

DSC04073

At exactly this moment, Boy 2 twigged what I was doing in the kitchen. What happened next is pretty predictable.

DSC04075

Boy 1 then got in on the act. The key, I think, to this recipe is the spices.

spices

If you like strongly cinnamon-y flavours, then you’ll like this. Boy 2 likes strong flavours and devoured his donut. If you don’t like strong flavours, then this recipe probably isn’t for you. That’s my Boy 1, who promptly gave his donut to his now sugared up brother. Me? I’m somewhere in between. If I make these again (taking into account that maple syrup here is like gold dust), I think I’ll dial back on the spices or use a vanilla cake base.

Oh, and Mom and Dad – I think I now qualify for a maple syrup emergency! Send some soon.

*http://sallysbakingaddiction.com/2014/09/17/maple-glazed-donuts/

Dream Weaver

So it’s the autumn, and autumn to me has always meant going back to school. So that’s what I’m doing! I figure I’m pretty competent in my professional life so I’m not going back to learn more about what I already know a lot about – although I like doing that. Nope. I’m going back to learn about how to be a blogger. I’ve enrolled in WordPress’s Blogging 101 course. Every day we have an assignment and, as a type A personality, I’m anxious to perform. Today’s assignment is to publish a post to your dream reader.

I’m old enough that when I read “dream reader” I hear in my head the music to “Dream Weaver”. Come on, I know that some of you are with me on this. Now you can’t get it out of your head, can you? …sorry about that. And a bonus for those of you too young to know the song I’m talking about, here it is.

I’m not sure that the actual lyrics are wholly relevant to this assignment but if you stick with me I’ll try to make a connection. The tone of the song is about leaving worries behind and living in the moment (in a psychedelic kinda way but that’s the way the 1970s rolled). I have a demanding day job – which I absolutely love – but when I wanted a break I logged into Pinterest which then led to me following blogs, and I was particularly excited about those that were being creative with fabric and flour. While these somewhat clandestine social media forays started out as a way to take my worries about the day away, they ended up being so inspiring that it kicked me back into actually doing craft, rather than thinking about doing it. And for that I have a debt of gratitude to those creative bloggers out there. As a poor way of paying that debt forward, I’m doing something I never thought I’d do – start my own blog.

But who do I want reading my stuff? Who is my dream reader? Someone like myself, looking for a dream weaver for just a small bit of time to take your mind off the worries of the day. Although it would be helpful if your dream was about fabric and flour too…

Image

Welcome to Fabric & Flour

Happy Autumn and welcome to my brand new blog.

This summer I started crafting again, after a very long absence. I missed it. I didn’t realize how much I missed it. Let’s not dwell on why I stopped. Well, OK -maybe just for a minute. You know that elusive idea that people refer to as (say this like the emcee for wrestling) WORK/LIFE BALANCE? Yeah, wasn’t happening.

But I took a couple of weeks off. I made a cutting table out of stuff we mostly already had – so now I don’t have to pack up every time I get a couple of hours to do something but not enough hours to finish it. I got going on a few quilting projects and started doing some more baking. Along the way, I tried to remember to take a few pictures to document my projects because I really wanted to remember some of the details. I didn’t do a very good job of remembering. Solution?

I’m a biologist, used to taking detailed fieldnotes* to describe observations and experiments. And I had become addicted to several crafty and bake-y blogs. So starting my own electronic fieldnotes for my own crafty-bakey projects seemed like a logical solution. This blog may end up just being my diary, read only by my husband (and then under duress), but if you want to join me on my expedition I’d be happy to share my fieldnotes about my experiments in fabricandflour.

A quick picture of my cutting table. Bijou but perfect. I heart my cutting table.

I heart my cutting table

Thanks for visiting.

Rhonda

*shhh…mostly it’s lab notes because I am rarely in the field. But “fabricandflour lab notes” isn’t alliterative like “fabricandflour fieldnotes”. And, for the record, I have done field work, so it’s not a complete fib!